Wednesday, July 6, 2016

Turn YouTube into Your Video Learning Library

Turn YouTube into Your Video Learning Library

A video is a medium that engages viewers from multiple senses - sight and sound. Videos can generate excitement about subjects or content and help our students understand and retain more information.

YouTube is a free video-sharing website with more than 65,000 videos uploaded daily.
YouTube is a platform that is providing teachers with a growing amount of visual information to share with our students.

Within YouTube, you can create a "playlist". A YouTube playlist is like a bookshelf: a collection of videos, organized and easy to access.
Curate great videos to use in your lessons by creating playlists with a specific content focus. You can quickly and conveniently share multiple videos with students and teachers with just one link.

YouTube can meet your classroom needs!
  • Collect videos with multiple purposes.
  • "How-to" videos for teachers tech skills.
  • Short narratives videos to practice thinking at deeper levels.
  • Public service announcements to share as mentor videos for student-created projects.
  • Funny videos for much-needed brain breaks. 
  • Some teachers create differentiated playlists: one for students who need more review and one for students who want to explore more and extend their knowledge.
Creating quality video playlists can also be a productive way for course teams to work together to build engaging lessons.


Here is how to create a playlist in YouTube:


Friday, June 3, 2016

3 Things to Wrap up Google Classroom for the Summer

credit to:
http://alicekeeler.com/2015/06/01/3-things-to-wrap-up-google-classroom-for-the-summer/
http://alicekeeler.com/2016/05/31/google-classroom-clean-folders/


Now that it is the end of the school year, what do you do with your Google Classroom?

1) Clean Up Google Drive

Google Classroom Folders


Google Classroom creates in Google Drive a folder for each class and each assignment. This can make for a lot of folders after you’ve been using Google Classroom for awhile. You can safely move Classroom folders in Google Drive. From the home screen in Google Classroom, you can click on the folder icon on the class title to locate the class folder in Google Drive. You can rename or move any of the folders within the class folder. You may want to save certain folders containing your favorite assignments.


Move The Folders

Archiving a class does not archive the class folder in Google Drive.  Tip to create an archive folder in the Classroom folder. You can drag your past class folders into the archive folder. There is no damage done by renaming folders or moving the folders.
Archive Class Folders

Move Folders, Press Z

There are a few ways to get your old class folders into the archive folder. Click on the folder you wish to move and just drag it into the archive folder.
Click on the folder and press Z to move the folder.
Click on the folder and use the move folder icon under the 3 dots icon in the toolbar to move the folder into the archive folder.

Rename Folders

Click on a folder and press N to rename the folder. You can also use the “Rename” icon under the 3 dots menu.

2) Document Assignments

Do you want to clean up your Drive a bit? Take a moment and go through your Google Classroom Folders and Files and determine what assignments worked well, which files you want to save as models or examples and which ones you can delete. If you are not sure at this point, leave this step for a later time.

3) Archive Google Classroom Class

From the home page, you can choose to archive the class. This saves the class, however, removes the class time from the home screen. It also removes the class from the Classroom menu. The ability to add to the class or edit by teachers or students is also disabled. On the class tile notice the 3 dots in the upper right-hand corner. Click on this to choose to archive the class.


Archived Classes

You can find the archived classes by going to the Classroom menu in the upper left-hand corner. Towards the bottom is the link to the archived classes.


Thursday, May 5, 2016

New updates to Google Classroom

New updates to Google Classroom

credited to Justine Tiu, Google Classroom User Experience Designer  
Since Google launched Classroom two years ago, they have added more than 50 updates to make it easier to manage assignments, communicate with students and stay organized. Check out the updates HERE
Here is Google's latest update in Classroom.

Schedule ahead, post later 

Teachers can now plan ahead by scheduling announcements, assignments and questions to post at a later date or a specific time (great for the early birds who want to get a head start on school planning during the summer ;). Just look for the scheduling option when posting new assignments, questions and announcements. You can find scheduled and draft posts in the “Saved posts” section of your class stream, and you’ll get email and mobile notifications when your scheduled posts go live.

Goole is also adding new updates to Classroom over the next week—all designed to help teachers save time and stay organized.

Wait Wait - there is more!!

Coming this fall: keeping parents and guardians in the loop 

Parents and guardians are instrumental to student success at school. And to the school leaders and teachers who’ve told Goolge they need an easy way to keep guardians updated with what’s happening in Classroom—Goole hears you! Later this year, Google will launch email notifications for guardians so they can stay involved and help to motivate their students.

Guardians will be able to sign-up to receive daily or weekly email digests of their student’s progress, upcoming work and class announcements. Administrators will be able to invite guardians directly and set domain-wide policies for guardian linking and notifications.


Tuesday, January 5, 2016

How To Take Screenshots With The Snipping Tool In Windows

How To Take Screenshots With The Snipping Tool In Windows

credit to: http://www.digitalcitizen.life & http://www.bleepingcomputer.com

All of us have done our fair share of working with images. Windows offers an easy way to use a tool for taking more complex screenshots, named the Snipping Tool.

In this post, I will share how to take screenshots with it, how to save, edit or email a screenshot, how to use available markup tools and how to change the settings of the Snipping Tool.

Where to Find the Snipping Tool in Windows 7


Where to Find the Snipping Tool in Windows 8 & Higher

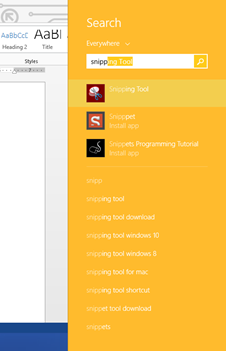
To open Snipping:

Open Snipping Tool by swiping in from the right edge of the screen, tapping (1) Search (or if you're using a mouse, pointing to the lower-right corner of the screen, moving the mouse pointer up, and then clicking Search), entering (2) Snipping Tool in the search box, and then tapping or clicking Snipping Tool.

1                                                              2


The window of the Snipping Tool application looks similar to the screenshot below.


Snipping Tool's Main Interface

The Snipping Tool window has three important buttons: New, Cancel and Options.
The New button allows you to select the type of screenshot that you want to take and then take a screenshot. The Cancel button allows you to cancel the current action. The Options button allows you to customize different aspects of the application.

How to Take a Custom Screenshot

There are four types of captures available when pressing the New button:
  • The Free-form Snip enables you to draw an irregular line around an object or area.
  • The Rectangular Snip allows you to take a screenshot shaped as a rectangle, by dragging the cursor around an object.
  • Window Snip allows you to select a window (e.g. your Internet browser) or dialogue box (e.g. error message received from an application) and capture it.
  • Full-screen Snip enables you to capture the entire screen, like the old-fashioned Print Screen key.

To share an example, let's see how it looks to capture a part of your Desktop using Rectangular Snip


And now, how it looks to capture a pic using Free-form Snip.


How to Edit a Screenshot

This editing window offers useful tools for editing the capture you took. For example, if you are not satisfied with the quality of the picture you can always make a new one using New Snip button.

Before saving your screenshot, you can use the Pen and Highlighter tools to add markup to the capture. The Eraser tool removes the marks made with the Pen and the Highlighter.

To save the screenshot, press the Save Snip button, select the location where you want it stored, type the file's name and choose the file type: PNG, GIF, JPEG or HTML. The, press Save.

You may email a screenshot, by using the Send Snip button on the toolbar. It gives you two options: E-mail Recipient and E-mail Recipient (as attachment). To use this button successfully, you need to have an email client installed on your computer. A strange thing we noticed is that the Snipping Tool doesn't work with modern apps from the Windows Store. It is capable of sending your screenshots via email only if you are using desktop email clients like Outlook or Thunderbird.

How to Customize the Snipping Tool

When you start the Snipping Tool, you can click or tap the Options button to set your preferences on how the program should work.

An Options entry is also found in the Tools menu, when editing the screenshots you take.

The available options are in two sections: Application and Selections groups.
The Application section has a set of checkboxes that enable you to make the following changes:
  • Hide Instruction Text - hide the instruction text in the main Snipping Tool window.
  • Always copy snips to the Clipboard - copy all captures to the Windows clipboard so you can paste them into other applications (e.g. Word processors or image editors).
  • Include URL below snips (HTML only) - save your snips as a Single File HTML or MHT documents. If a snip is taken from an Internet Explorer window, it also shows the URL of the webpage included in the screenshot.
  • Prompt to save snips before exiting - gives you a heads up if you have any captures that you have not saved, prior to closing the program.
  • Show screen overlay - if disabled, when you are taking a screenshot, the Snipping Tool transparent overlay is no longer shown on the screen.

The second section, named Selection Options, allows you to make a few settings regarding the color palette :
  • Ink Color - changes the color of the selection border when you create a snip.
  • Show selection ink after snips are captured - when enabled, the selection border is shown around the snip, using the color selected in the 'Ink Color' list.

Conclusion

Now that you know how to use the Snipping Tool, the coast is clear for you to take great looking screenshots. If you have any questions or tips to share, feel free leave a comment.

Friday, December 11, 2015

4 Things You Can Do Right Now to Create a Perfectly Organized Google Drive

Proper folder structure, naming conventions, color coding, and keeping track of what is shared with you can go a long way when used properly. These 4 tips show the best way to organize your Google Drive for faster navigation so you never lose track of a document again.

1. Folder Structure Comes First

The best starting point is creating a clean universal folder structure. An easy way to do this is to create a folder for each category of document and then make subfolders for each aspect of that category. An ‘uncategorized’ folder can house all the documents that don’t fit into any of the other folders yet. Scan through the ‘uncategorized’ folder regularly and sort its contents into the appropriate labeled folders if possible.
Within each subfolder, it is a good practice to create folders that are dated by week to keep track of the dates each document is created, that way no folder becomes too full and difficult to sort through.
To create a folder click the red NEW button and then select the option for folder.

2. Add Some Color

Google Drive has an awesome feature that allows you to color-code your folders, this can be done in such a way that makes sifting through your drive much faster.
I made each folder in my drive a different color and then each subfolder a different shade of that same color. The dated weekly folders within each subfolder are the same shade as the subfolder it is contained within. This way, if I am looking at a folder titled “April 6-12” I can instantly tell what types of documents are contained in it simply by glancing at its hue.
To change the color of a folder, click the arrow to the right of the folder name on the top bar then select the change color option.

3. Standardize Your Naming Conventions

Date created is a mysteriously absent field in Google Drive, instead you can only view when a document was last updated. Finding a document by it’s creation date is sometimes useful and more intuitive, which should be considered when designing your naming convention.
We think it is best to name every document in the following way “[DateCreated] DocumentName” and then let the folder structure and color coding do the rest. For example a student loan payment receipt created on the 19th of April would be titled “[4.19] Student Loan Payment Receipt” this will be easy to find whether you are searching for the date or the title of the document.
To rename a document, highlight the documents name in Drive and then click the three vertical dots on the right side of the top bar. Then select rename.

4. Shared with you, organized by you

When a document is shared with you, it can be hard to locate because it is not automatically added to your My Drive folder. Make sure to add the file to the appropriate folder in your My Drive. If it does not adhere to your naming conventions, create a folder that fits the naming convention and add the shared file to that folder.
To add a document that is shared with you to your My Drive, highlight the document in the Shared with Me folder and then click the three vertical dots on the right side of the top bar and select Add to My Drive from the dropdown menu.

Friday, November 13, 2015

A Student's View of Use of Computers in a High School

A Student's View of Use
        of Computers in a High School

Audrey Mullen is a sophomore at Presentation High School in San Jose, CA. “She started Kite Reviews, an all-student consulting service that provides user reviews of your edtech products. She’s worked with Brainpop, All Can Code, and Readorium.” Her opinions about teacher and student use of iPads and software offer one person’s on-the-ground view. Rare to get such perspectives. This appeared in EdSurge‘s weekly post, September 25, 2015.


The Good

Teachers Do Some Walking
I sit in the back of class when I can. As result, I see everyone’s iPad screens. Every day around the tenth minute of class, the screens start switching to social media. I see photos of friends at the beach or ugly selfies. You think we’re taking notes because we don’t look up and we seem serious. But we’re Snapchatting across the room or even the world. It’s like yawning; one person starts and soon everyone is doing it.
Teachers: Walk around during class. Stroll to the back of the room. If you could see what I see . . .
 _______________________________________________________________________
Give Us Games (aka, Make Learning Fun)
It is the final round of Jeopardy in Ms. T’s sixth period biology class. Winner takes all. It’s getting heated. With two minutes until the bell rings, it all comes down to the final question. “Cells” for 200 points or “Human Body Systems” for 250? We choose to go big. As Ms. T asks the question, our hearts race. She asks, we answer . . . we win! The bell rings, and we leave the room knowing no other class that day will be as fun or educational. And I think it’s educational specifically because it’s fun.
Teachers: If you make our hearts race, even a little bit, you are doing something very, very right. Come up with creative and engaging games. I Googled for ideas. There are millions.
  _______________________________________________________________________
Be Crazy, Hyper-Organized With Your Technology And We Will Love You For It
Mrs. C. was no one’s favorite teacher. She wasn’t nice, she wasn’t mean.
She just didn’t have much personality. I probably would have forgotten her by now except for one thing: SHE WAS ORGANIZED LIKE NO ONE YOU’VE EVER MET. Mrs. C. was an Organization Queen. She put the entire semester on the calendar. Most teachers at my school do it by unit. Then . . . this was incredible . . . she put EVERYTHING on Canvas. I love Canvas; we all LOVE Canvas (see below). This seemed impossible: All the homework assignments, all the grades, everything was always right there.
The challenge for students is that some teachers rely on technology; others refuse to use it. We’re caught in the middle. Most teachers are in-between and it gets confusing very fast. But in this class, there were never any surprises. I was and still am grateful.
Teachers: Keep all your information in one place. Don’t go scattering it around in different apps. Whether it is Canvas or another learning tool, please make sure you know how to use all the features to assign work.
  _______________________________________________________________________

The Bad
A Cat Is Not a Dog; An iPad Is NOT A Computer
The iPad is a wonderful thing. But here’s what drives me crazy: Teachers expect it to replace the computer. Have you ever typed directly on an iPad? Kill me. Almost every word is a typo. Then those typos get auto-corrected. You end up with Marie Antoinette saying, “Let’s then ray bake You see my issue.
And don’t get me started on keyboards that connect to the iPad. The only good ones are super expensive, and they get destroyed in your backpack. Remember, even with all the cool new tech in schools, you still have me carry 45 lbs of books over my shoulder. Last year, my Logitech keyboard lasted 3 weeks before keys started to fall off. My Dad said it was my fault and wouldn’t get me a new one. After every other keystroke, “[ “ would appear. Sentences looked like, “Marie[ Antoinette, s[aid[[, let th[[em eat[ cak[e.” It was possibly the most frustrating thing ever. Did my teachers care? Not a bit.
Teachers: On behalf of millions of students everywhere, I beg: Don’t make us type on an iPad.
 _______________________________________________________________________

Pick Your Poison! Stop Juggling between Paper and Digital
What gets my goat? When teachers can’t decide between distributing online copies or physical copies. Make a decision. Stick with it. Be strong. Do I need a physical binder for this class, or not? Is last week’s assignment sitting on Google Drive, or is it in my backpack, where things go to die? I understand when a digital-first teacher gives me a hard-copy study guide; it’s because this specific test won’t be online. But when teachers constantly and randomly alternate between worksheets that are digital and paper, Audrey no buena.
I had this teacher, Mrs. F. She would make us do all our homework online. We would download it off Google Drive, then fill it out using Notability. This was all good. Until we had to turn it in. She had us print it out . . . every day, every assignment. See, Mrs. F. didn’t like grading online. Which is fine, but then you should make the commitment to only do paper and limit online.
Teachers: Don’t flip between online and hard copies. It’s hard enough to manage in one class, and a disaster when half my teachers do it.
  _______________________________________________________________________

When Good Personalization Goes Bad: R.I.P. Collaboration?
I went to ISTE 2015 in Philadelphia, where I participated on a panel called “Youth Voices in Edtech.” My biggest takeaway from this huge teacher conference was the focus on individualized and personalized learning. It’s not something we students think about. It sounds great for the most part, until you realize that everyone is off doing their own thing. Whatever happened to good old-fashioned group work?
There have been times where I have nearly murdered my fellow group mates while doing a project. In most projects there is always one person in the group who doesn’t do any of the work and everyone else has to overcompensate to make up for it. These are “work anchors”. But with each work anchor you learn a little more. A little about teamwork and cooperation. More than if you were working by yourself. It is crazy how we as students are losing the life skill of working together as each solo activity is assigned.
Teachers: I’m not exactly sure why this worries me. It is pretty deep. If you spend too much time trying to individualize my learning, will I stop knowing how to work with others? My goodness, at home we don’t even watch TV together. My sister and I go to our bedrooms, and binge on our own Netflix shows. Kids are already living individualized experiences. What I think we need more of are skills to collaborate.
 _______________________________________________________________________

Put Away the Phone
I was born in the age of technology, in the heart of it, in Silicon Valley. Technology is inseparable from my life. Most of us got phones as sixth grade started. We noticed it quickly got to the point where we were no longer hanging out together; we were just checking our social medias in the same room. So we hacked a solution. Now at lunch, we stack our phones like a Jenga puzzle. Whoever grabs hers first has to buy everyone ice cream. It’s a win-win situation.
Teachers: Save us from ourselves. Don’t go crazy with phone rules and regulations because we won’t follow them. Instead just stick with the basics–no phones during school hours.
 _______________________________________________________________________

More Please: Four Tools That Save My Life
There are some iPad apps that are simply horrible. (I’m talking to you, Google Slides). But others have been sent by God himself to help students learn. Here are four examples of the best of classroom tech.
Khan Academy: I have friends who don’t see eye to eye with me on Khan Academy. They still believe it’s the same math-only website their teacher made them use four years ago in sixth grade. Guys, please join us in 2015. Khan Academy has science, language arts, programming, and much more. I like to think of it as my partner in school. If a teacher’s lecture is hard to understand, I pop onto Khan. Often I only need 30 seconds. I visit the website maybe 20 times a week. I think I need to credit Khan Academy for 0.5 points of my 4.2 GPA (shameless bragging).
Quizlet: No one puts down Quizlet. Ever. It’s a life saver. We have the ability to share “quizlets” (short practice tests and flash card sets) with any other student, which makes our lives 1,000,000 times easier. It’s fast and simple. (Note to programmers: Make it simple! I don’t want to think about your technology; I want to be using it.). For my bio final last spring, a classmate made two quizlets and shared them with everyone. One had all the test questions we saw during the semester. The other was a vocabulary review. She was our hero.
Canvas: Have you ever seen the average high-school kid’s backpack? It is where Hope goes to die. Papers flying everywhere, sticky food wrappers crumpled at the bottom.
Then there’s Canvas, which is the opposite of the dark hole of my backpack. Canvas makes life easier. Last year, three of my seven teachers used it. This year, it’s six out of seven, and I heard the school is making it mandatory second semester. Everyone hopes so. Teachers, if you are still using Google Docs to turn in assignments, please remove yourself from the last decade and join 2015. It is efficient, easy and incredibly organized. Ten out of ten kids will recommend it.
Notability: And then God said, “let there be Notability.”
Notability is possibly my favorite edtech app of all time, and that is saying something.

Notability is an app that’s sole purpose is to be an easy and organized place to take notes (shocking). Unlike Google Docs, with Notability you can write the notes with your own handwriting–which makes it a great tool to fill out worksheets with. Also it syncs up with Canvas and Google Drive so that it is super easy to turn in home work.

credits to:
https://larrycuban.wordpress.com/2015/10/14/students-view-of-use-of-computers-in-a-high-school-audrey-mullen/ 

Monday, November 2, 2015

Kahoot and Socrative


Gamifying Learning COMPARING SOCRATIVE AND KAHOOT

Image
Sometimes we want a quick check to see how our students are doing with a topic. We want to ask a few questions and know right away if the students were right or wrong. We want to be able to discuss questions students got wrong in the moment, so they can learn from their mistakes and deepen their understanding. We also want our students to be engaged in class and motivated to learn.

Many tools exist that allow us to “poll” and “quiz” students on devices.  This post looks at two such tools, Kahoot and Socrative. The following links will take you to the Google Slides used at our lunch tech session Kahoot and Socrative on the Week of Oct. 28th. 

Kahoot is a web-based tool that allows you to survey students, ask formative assessment questions, or facilitate an online discussion in a fun and competitive manner.  

Socrative is very similar... it is not used so much for its competitive aspect, but can be used for quick quizzes and also on the fly. You can post as many questions as you like in a variety of formats. One of the more fun question formats is the “space race” format in which students can work individually or in teams to answer questions as quickly as possible.  

In Kahoot, a neat feature is the bar graph shown after each question. In Socrative, when you choose a “teacher run” quiz, you then click a button called “How are we doing?” after all students have responded. The result is the bar graph showing how many students chose each answer. These features are critical in classes that are serious about formative assessment, or assessment for learning. With the bar graphs, teachers can have their students engage in conversations about what made one answer right and the others wrong, or students can discuss what would have to be different about the other responses in order for them to be correct.  
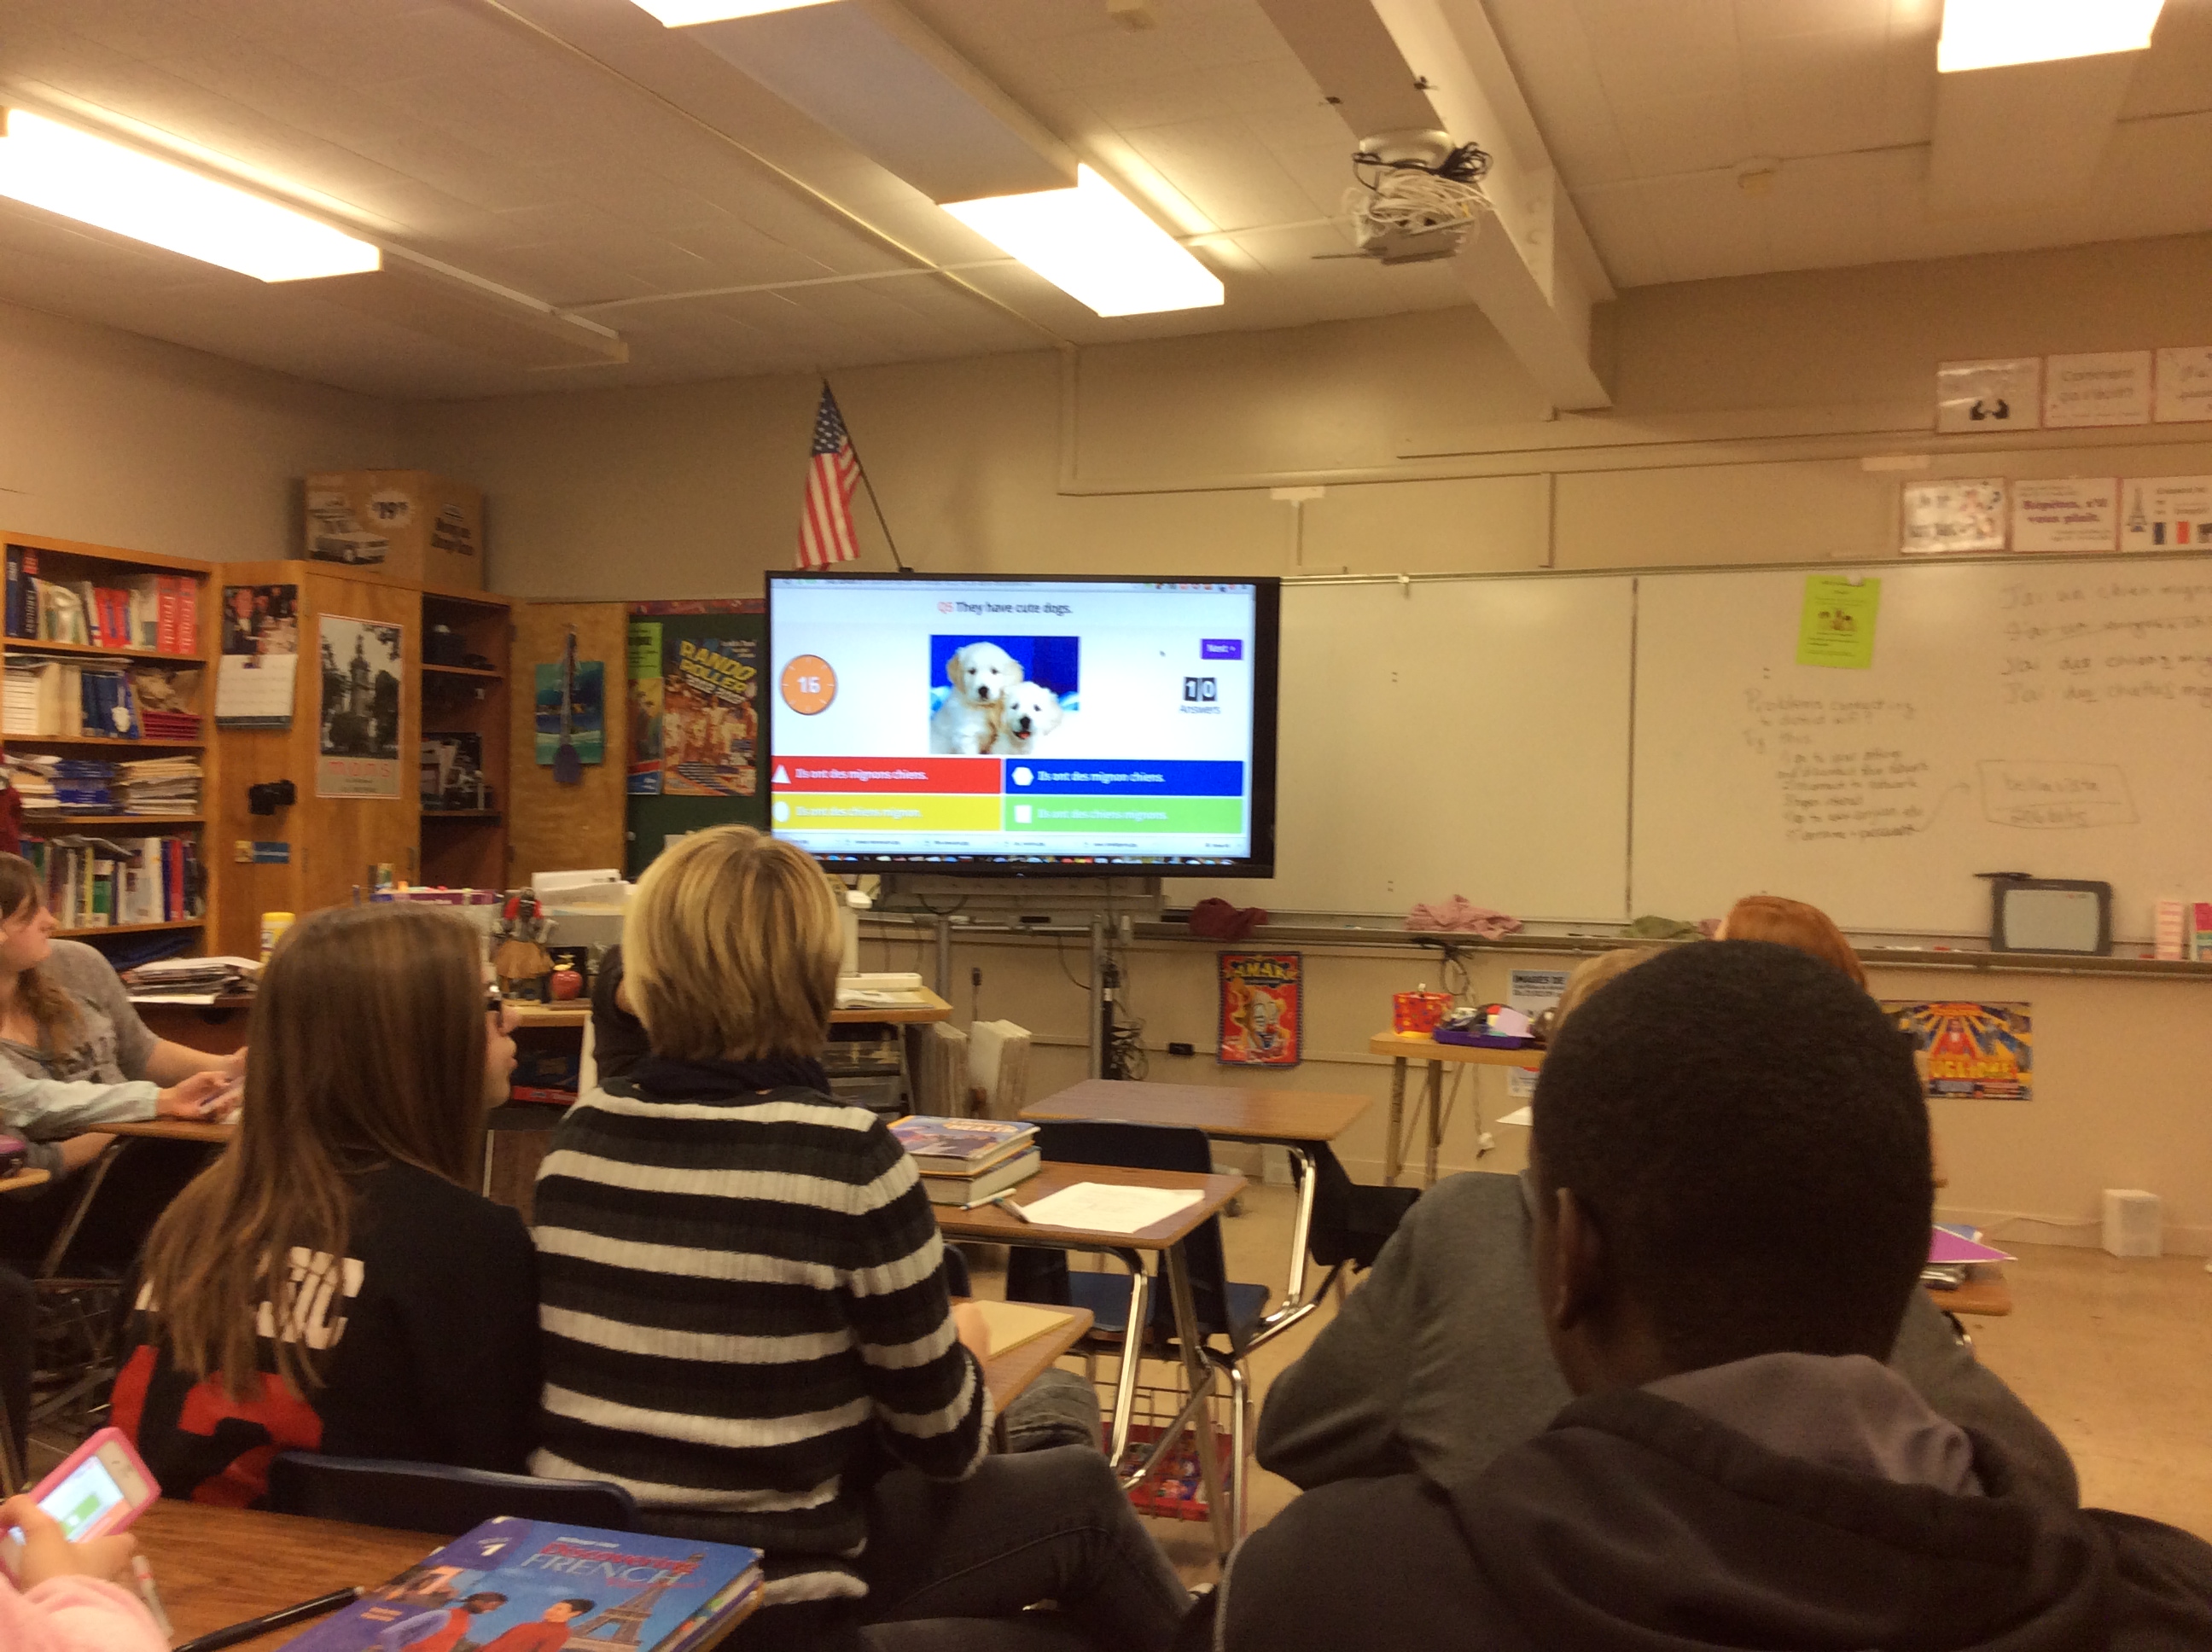
Socrative has a “student-paced, student-navigated” quiz. In this format, students can answer individually, in a non-competitive, more “serious” format. It presents questions and answers very clearly on the student’s device.  Kahoot requires that students be able to see the questions projected at the teacher's screen, because only the answer choices appear on their devices–and even then they only appear as colors and shapes–the text of the answers is also only available on the teacher's screen. This makes Kahoot great for doing formative assessment as a whole class, but not so much for assessments they are intended to complete individually or that might even be graded by the teacher. Again, having a variety of tools in the tool box is important. 
Gamifying formative assessment
space_race_3
Two teams competing in Socrative’s Space Race. They receive feedback on their devices as to whether their answers were right or wrong.
Kahoot "quiz" screen durin gcompetition. Students' devices only show colors and shapes for answer choices. All text is on the front screen.
Kahoot “quiz” screen during competition. Students’ devices only show colors and shapes for answer choices. All text is on the front screen.
In the area of engagement, Socrative’s Space Race is quite good, but when it comes to student engagement, Kahoot comes out on top.
Socrative's Space Race shows questions, and uses team rockets (by color) to show which team is making progress the fastest, but students are even more engaged when the “quiz” starts on Kahoot. In fact, you can hear their engagement. Why? Because it uses a valuable instructional strategy: it builds in thinking time. Kahoot does this by initially showing the question and then waiting several seconds before the response choices are visible and before they can be selected on student devices. As a result, you can hear the student teams discussing the question and formulating answers before the choices even appear. Once the choices are visible, you can also hear the students discussing why their choice wasn’t there, or their validation when their correct choice was present.
In both Socrative’s Space Race and in Kahoot, students receive immediate feedback on their devices regarding their responses. Here are some feedback screens students see in Socrative and Kahoot.
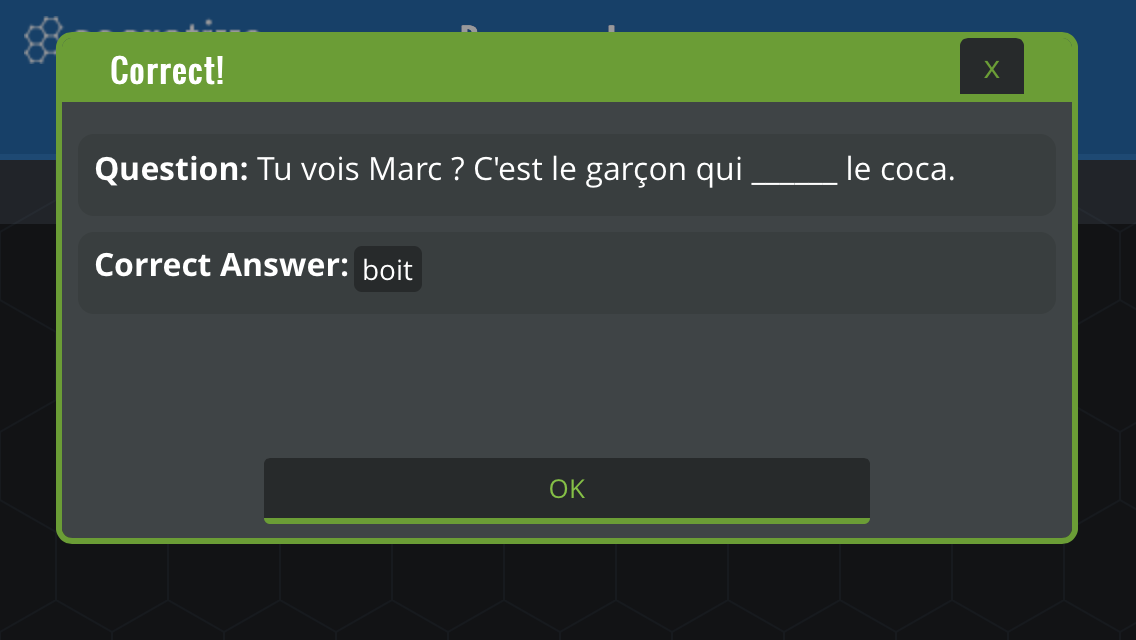
Student screen after a correct response (this version had no written "feedback" about the responses)
Student screen after a correct response (this version had no written “feedback” about the responses)

Incorrect response, as seen on student's device. When not playing "space race" students can also receive comments about why they answer was incorrect (you must create the comments when you create the quiz).
Incorrect response, as seen on student’s device. When not playing “space race” students can also receive comments about why they answer was incorrect (you must create the comments when you create the quiz).
Here's what the student sees when he/she selects an incorrect response in Kahoot.
Here’s what the student sees when he/she selects an incorrect response.
At the end of the Kahoot  game, students receive an overall score and ranking and can share on social media.
At the end of the Kahoot game, students receive an overall score and ranking and can share on social media.
Additionally, students also seem to prefer the competition style used in Kahoot to Socrative’s “Space Race”.  They like the fact that each question is timed, They also really like the “leaderboard”. After each question, and after showing the bar graph of the responses, Kahoot shows which five teams are in the lead. Teams get more points for providing a correct response quickly, so leaderboard can change drastically after just one question.
It should be noted that students can work in teams or individually (decided upon by the teacher). 
A mentioned key factor in choosing an online formative assessment tool is real-time data. This is really where Kahoot and Socrative both shine, in slightly different ways. Both tools have the capacity to show bar graphs with data regarding how many teams chose each response. In Socrative, the best type of quiz for this appears to be “teacher-paced”. This version of your quizzes will allow to you choose to display a bar graph after any question. It is not automatically displayed as it is in Kahoot. As mentioned above, in Socrative, you have to click the button called “how are we doing?” in order for the bar graph to appear, but once you click on it, the graph is very clear and each option is easy to see and discuss. Socrative has another great feature that is not available in Kahoot: it allows you to also toggle on or off the display of feedback regarding their answers to the students on their devices. This is defaulted to “off” in the teacher-paced quizzes, probably to facilitate the discussions you would want to have after the bar graphs are displayed. However, in student-paced quizzes, you can opt to turn on the feedback. If you typed in any information about why a certain answer was right or wrong, that information will be provided to the students after they submit each response. This is not an option in Kahoot (they are told the right answer, but there is no way to push information to their devices that tells them why it is the right answer or what makes the other answers wrong). It is also easier to have students complete a quiz anytime, anywhere in Socrative: as a teacher you can just open a quiz and leave it running…any student who joins your “room” will see that quiz after they sign in. However, you can only run one quiz at a time, so if you teach several different classes you will have to be sure to “finish” a quiz that is running before you can start another one.
What about when the quiz is over? What data is available to the teacher? Both Socrative and Kahoot provide a variety of data reports teachers can analyze, including whole-class response graphs for all the questions, and data on individual students or even how the whole class responded to individual questions. Here are some screens of the data reports you can look at in both tools:
Socrative report request screen.
Socrative's report request screen. You can request individual student data, individual question data and/or an overall report.
Socrative’s report request screen. You can request individual student data, individual question data and/or an overall report.
Kahoot’s spreadsheets:
You can see data about one question from this Kahoot screen, including how many got it right or wrong, how each student answered, and even how long each student took to arrive at a response.
Kahoot provides one other type of data for teachers: students can actually evaluate the quiz after completing it. They can rate it 0-5 stars for how “fun” it is, indicate if they felt they actually learned from participating, whether or not they liked it and whether or not they would recommend it. This screen was not from an actual class, but rather me taking the quiz as two students and I forgot to click on the stars…
Getting feedback from the students regarding their perceptions and feelings after participating in Kahoot.
So, where does all this leave us? Since it is important to have a variety of tools (both for student interest and because we must always select the right tool for the right situation), both Socrative and Kahoot are great options to have in our toolbox. 
Kahoot!Socrative
Need an account to administer quiz/gameYESYES
Need an account to create and saveYESYES
Q and A appear on student screenNO, question is on teacher screen, answers on student screenYES
Can include imagesYESYES
Options for Self-paced or timedYESYES
Gamified for fun competition in classYES - YESYES
Teacher can ask an instant question during a lessonNOYES
Has a ready-made exit ticket that can be usedNot really, but you could make one and use it over and overYES
Can search for games/quizzes made by othersYESNot really, but you can import a quiz from another teacher
Includes options for mathtypeYESYES
Can scramble questions and answersYESYES
Has an iOS and Android appNOYES
Has a FREE accountYESYES
Help is availableYESYES