How To Take Screenshots With The Snipping Tool In Windows
credit to: http://www.digitalcitizen.life & http://www.bleepingcomputer.com
All of us have done our fair share of working with images. Windows offers an easy way to use a tool for taking more complex screenshots, named the Snipping Tool.
In this post, I will share how to take screenshots with it, how to save, edit or email a screenshot, how to use available markup tools and how to change the settings of the Snipping Tool.
Where to Find the Snipping Tool in Windows 7
Where to Find the Snipping Tool in Windows 8 & Higher
To open Snipping:
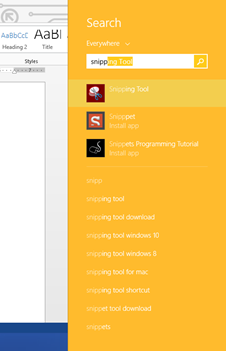
Open Snipping Tool by swiping in from the right edge of the screen, tapping (1) Search (or if you're using a mouse, pointing to the lower-right corner of the screen, moving the mouse pointer up, and then clicking Search), entering (2) Snipping Tool in the search box, and then tapping or clicking Snipping Tool.
1 2

The window of the Snipping Tool application looks similar to the screenshot below.
Snipping Tool's Main Interface
The Snipping Tool window has three important buttons: New, Cancel and Options.
The New button allows you to select the type of screenshot that you want to take and then take a screenshot. The Cancel button allows you to cancel the current action. The Options button allows you to customize different aspects of the application.
The New button allows you to select the type of screenshot that you want to take and then take a screenshot. The Cancel button allows you to cancel the current action. The Options button allows you to customize different aspects of the application.
How to Take a Custom Screenshot
There are four types of captures available when pressing the New button:
- The Free-form Snip enables you to draw an irregular line around an object or area.
- The Rectangular Snip allows you to take a screenshot shaped as a rectangle, by dragging the cursor around an object.
- Window Snip allows you to select a window (e.g. your Internet browser) or dialogue box (e.g. error message received from an application) and capture it.
- Full-screen Snip enables you to capture the entire screen, like the old-fashioned Print Screen key.

To share an example, let's see how it looks to capture a part of your Desktop using Rectangular Snip

And now, how it looks to capture a pic using Free-form Snip.


There are four types of captures available when pressing the New button:
To share an example, let's see how it looks to capture a part of your Desktop using Rectangular Snip
And now, how it looks to capture a pic using Free-form Snip.
- The Free-form Snip enables you to draw an irregular line around an object or area.
- The Rectangular Snip allows you to take a screenshot shaped as a rectangle, by dragging the cursor around an object.
- Window Snip allows you to select a window (e.g. your Internet browser) or dialogue box (e.g. error message received from an application) and capture it.
- Full-screen Snip enables you to capture the entire screen, like the old-fashioned Print Screen key.
To share an example, let's see how it looks to capture a part of your Desktop using Rectangular Snip
And now, how it looks to capture a pic using Free-form Snip.
How to Edit a Screenshot
This editing window offers useful tools for editing the capture you took. For example, if you are not satisfied with the quality of the picture you can always make a new one using New Snip button.
Before saving your screenshot, you can use the Pen and Highlighter tools to add markup to the capture. The Eraser tool removes the marks made with the Pen and the Highlighter.

To save the screenshot, press the Save Snip button, select the location where you want it stored, type the file's name and choose the file type: PNG, GIF, JPEG or HTML. The, press Save.

You may email a screenshot, by using the Send Snip button on the toolbar. It gives you two options: E-mail Recipient and E-mail Recipient (as attachment). To use this button successfully, you need to have an email client installed on your computer. A strange thing we noticed is that the Snipping Tool doesn't work with modern apps from the Windows Store. It is capable of sending your screenshots via email only if you are using desktop email clients like Outlook or Thunderbird.

This editing window offers useful tools for editing the capture you took. For example, if you are not satisfied with the quality of the picture you can always make a new one using New Snip button.
Before saving your screenshot, you can use the Pen and Highlighter tools to add markup to the capture. The Eraser tool removes the marks made with the Pen and the Highlighter.
To save the screenshot, press the Save Snip button, select the location where you want it stored, type the file's name and choose the file type: PNG, GIF, JPEG or HTML. The, press Save.
You may email a screenshot, by using the Send Snip button on the toolbar. It gives you two options: E-mail Recipient and E-mail Recipient (as attachment). To use this button successfully, you need to have an email client installed on your computer. A strange thing we noticed is that the Snipping Tool doesn't work with modern apps from the Windows Store. It is capable of sending your screenshots via email only if you are using desktop email clients like Outlook or Thunderbird.
How to Customize the Snipping Tool
When you start the Snipping Tool, you can click or tap the Options button to set your preferences on how the program should work.

An Options entry is also found in the Tools menu, when editing the screenshots you take.

The available options are in two sections: Application and Selections groups.
The Application section has a set of checkboxes that enable you to make the following changes:
- Hide Instruction Text - hide the instruction text in the main Snipping Tool window.
- Always copy snips to the Clipboard - copy all captures to the Windows clipboard so you can paste them into other applications (e.g. Word processors or image editors).
- Include URL below snips (HTML only) - save your snips as a Single File HTML or MHT documents. If a snip is taken from an Internet Explorer window, it also shows the URL of the webpage included in the screenshot.
- Prompt to save snips before exiting - gives you a heads up if you have any captures that you have not saved, prior to closing the program.
- Show screen overlay - if disabled, when you are taking a screenshot, the Snipping Tool transparent overlay is no longer shown on the screen.

The second section, named Selection Options, allows you to make a few settings regarding the color palette :
- Ink Color - changes the color of the selection border when you create a snip.
- Show selection ink after snips are captured - when enabled, the selection border is shown around the snip, using the color selected in the 'Ink Color' list.
When you start the Snipping Tool, you can click or tap the Options button to set your preferences on how the program should work.
An Options entry is also found in the Tools menu, when editing the screenshots you take.
The available options are in two sections: Application and Selections groups.
The Application section has a set of checkboxes that enable you to make the following changes:
The second section, named Selection Options, allows you to make a few settings regarding the color palette :
An Options entry is also found in the Tools menu, when editing the screenshots you take.
The available options are in two sections: Application and Selections groups.
The Application section has a set of checkboxes that enable you to make the following changes:
- Hide Instruction Text - hide the instruction text in the main Snipping Tool window.
- Always copy snips to the Clipboard - copy all captures to the Windows clipboard so you can paste them into other applications (e.g. Word processors or image editors).
- Include URL below snips (HTML only) - save your snips as a Single File HTML or MHT documents. If a snip is taken from an Internet Explorer window, it also shows the URL of the webpage included in the screenshot.
- Prompt to save snips before exiting - gives you a heads up if you have any captures that you have not saved, prior to closing the program.
- Show screen overlay - if disabled, when you are taking a screenshot, the Snipping Tool transparent overlay is no longer shown on the screen.
The second section, named Selection Options, allows you to make a few settings regarding the color palette :
- Ink Color - changes the color of the selection border when you create a snip.
- Show selection ink after snips are captured - when enabled, the selection border is shown around the snip, using the color selected in the 'Ink Color' list.
Conclusion
Now that you know how to use the Snipping Tool, the coast is clear for you to take great looking screenshots. If you have any questions or tips to share, feel free leave a comment.
Now that you know how to use the Snipping Tool, the coast is clear for you to take great looking screenshots. If you have any questions or tips to share, feel free leave a comment.